
When taking a photo either in automatic or in full manual mode, there are three crucial components to creating every exposure. ISO, Shutter Speed and Aperture. Each component influences the other and reducing one component means increasing another. When using automatic, the camera decides the setting for you, however if you want to take control and have more creativity with your photography, it is a good idea to understand how the exposure triangle works and switch to Manual or Semi Manual. This is Part 3 of a 3 part series of blog posts on the exposure triangle.
Shutter speed refers to how fast the camera’s shutter opens and closes to make the exposure. It is measured in seconds and fractions of seconds. The smaller the fraction, the faster the shutter speed. Therefore an exposure of 1/250th of a second is 7 times faster than an exposure of 1/2 a second. Having this knowledge can help us create some very interesting and creative images. It allows us to stop in time in mid air at 1/250th of a second, or show the movement of time at 1/2 a second.
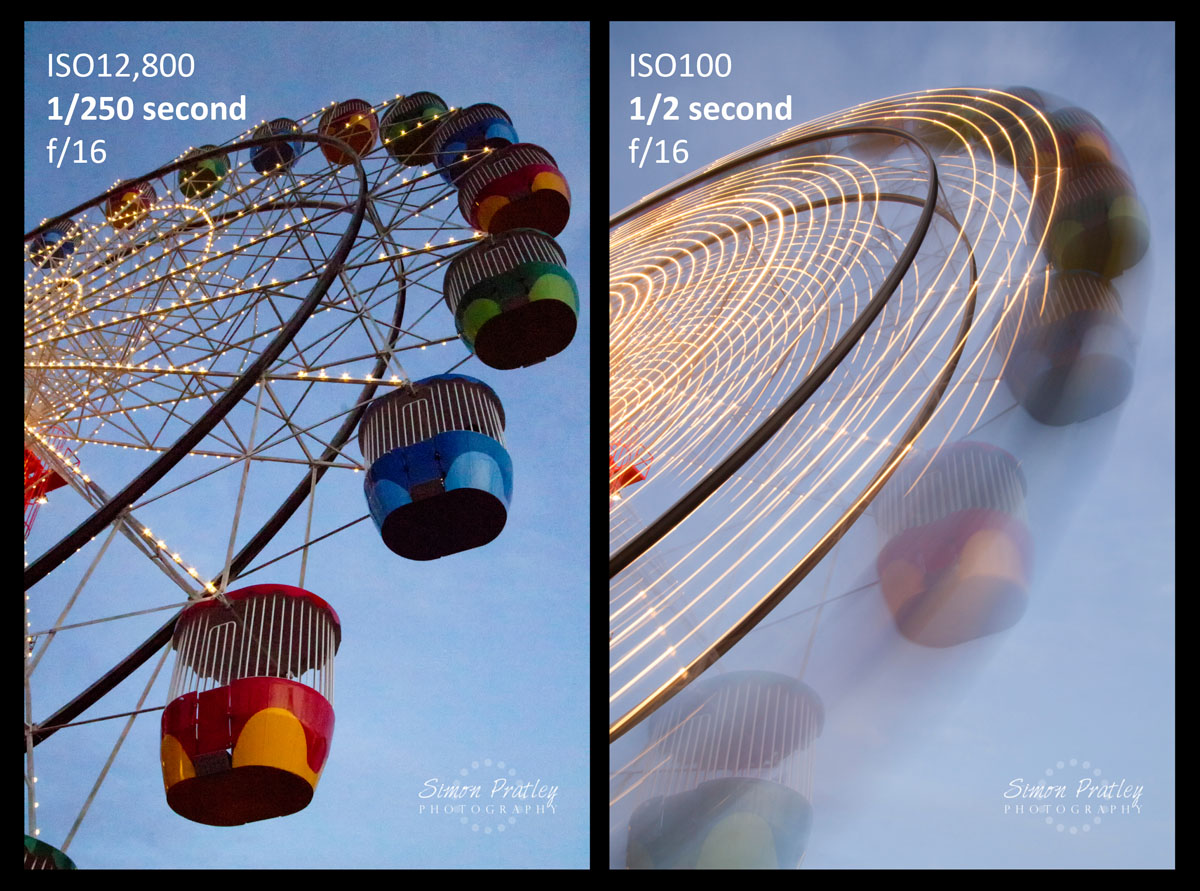
Using a faster shutter speed we can freeze the shot. So if we wanted to capture the cabins of a ferris wheel as it is moving we could use a fast shutter speed like 1/250th of a second to freeze the action. We can clearly see the cabins and structure of the ferris wheel. However if we wanted to have a different look and be a little more creative, we could use a slower shutter speed for example ½ a second to have a more flowing image of the ferris wheel. Now the cabins look blurred, but at the same time this shot gives the illusion that the ferris wheel is moving. Just remember to use a tripod when shooting at slower shutter speeds.

We can control the shutter speed by using full manual mode M to give us full creativity. Or if full manual sounds a bit daunting, use the semi manual mode called Shutter Priority. This is Tv on a Canon or Pentax and S on a Nikon or Sony. When starting out, the advantage of using the semi manual shutter priority mode is you only need to set the shutter speed and ISO, the camera sets the aperture.
Changing the shutter speed will affect one of the other two components of the exposure triangle because we are affectively changing the amount of light entering the camera. If we change our shutter speed from 1/500th of a second to 1/2 a second like in the images above, we are opening up by eight stops. In other words an exposure of 1/2 a second is eight times slower than at 1/500th of a second and allowing eight times as much light to enter the camera. This will result in a very over exposed photo.
To overcome this our options are to change either the ISO or the aperture. In the images above I decided to keep the aperture at f/11.0 because I liked the depth of field (the amount of photo in focus). Depth of field is a very creative tool and is explained in my blog regarding Aperture. Since I wanted to keep the same aperture it left me with only one other option, to change the ISO. I needed to change the ISO eight stops to have a perfect exposure, from ISO12,800 to ISO100. This might sound a lot, but with a digital camera it is very easy. By doing this we reduce the amount of light by eight times, bringing the exposure back to normal.
By stopping down to a shutter speed of 1/2 a second I needed to use a tripod to keep a sharp image. There is no way to hand hold a camera and take a sharp image at such a low shutter speed.
The exposure triangle is a very important concept to understand if we want to take control of our photography. By simply relying on our camera’s automatic mode we are very restricted and often cant’ take the creative and interesting photos that we visualise. Check out these other posts to learn more about the exposure triangle. The Exposure Triangle: Part 1 ISO and The Exposure Triangle: Part 2 Aperture.